This post may contain affiliate links. Please read my disclosure policy.
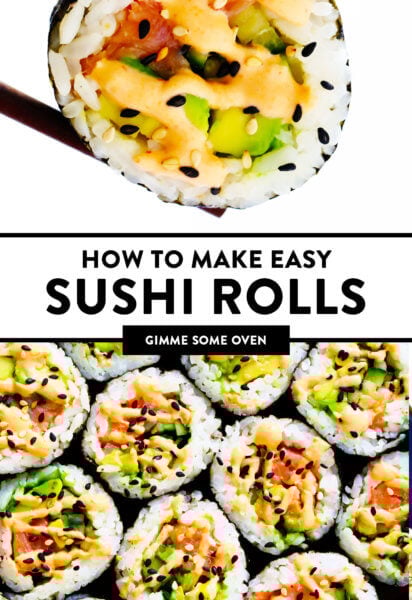
Learn how to make sushi rolls (maki rolls) with this easy homemade sushi recipe. The fillings and toppings here are 100% up to you, so choose whichever ingredients you love best!
Guys, have you ever tried making homemade sushi rolls? ♡
It’s actually much easier than you might think. And of course, the best part of making your own sushi rolls is that you get to decide exactly what goes in them. Yyyyyum.
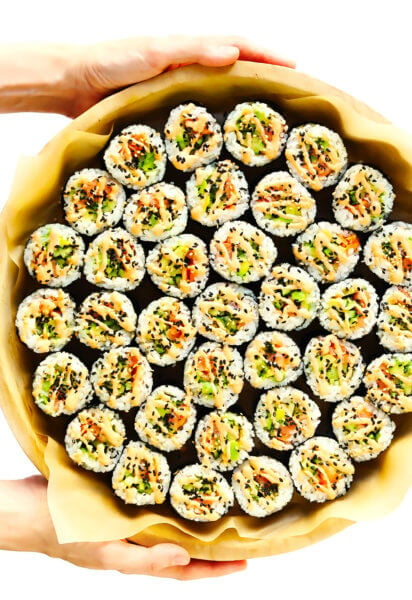
Since all of our favorite sushi restaurants have been closed these past three months, Barclay and I have gotten in a rhythm of making ourselves a big batch of homemade maki rolls here once a week. (Sushi Sundays!) And I have to say — it has been so fun! We prefer to keep things super no-frills around here, and usually just make our sushi with a few simple fillings plus a drizzle of spicy mayo. But holy yum, these simple rolls have totally satisfied our sushi cravings during these weeks of staying at home. And now that we have our assembly-line routine down, the two of us have found that we can make a big batch in just 30 minutes or so. Not bad!
Now I will be the first to admit that our techniques for making maki rolls are not 100% authentic or traditional. But that’s kind of the point — we just use the equipment that we already have and keep our ingredient list super-minimal, and this recipe works really well for us! And best of all, it yields so much delicious sushi. ♡♡♡
So if you are also missing your favorite restaurant sushi right now, I thought I would offer a quick tutorial on how we make homemade sushi here in our house! This recipe itself is not hard, but it does require a bit of extra time to prep all of those ingredients and make the maki rolls. If you have a buddy (or in my case, a very enthusiastic sushi-loving husband) in the kitchen to help, the process can go much faster. But however you make them, I think you will be pleasantly surprised at how quickly, easily and affordably you can make your very own homemade maki rolls. Plus, it’s just fun!
Here’s everything you need to know…
Maki Roll Ingredients:
Alright, let’s chat about ingredient first! Aside from produce and fish, most of the ingredients that you need to make basic maki rolls can be found in the Southeast Asian section of your grocery store. Or if not, you can also totally order them online. (If you plan on making an extra-large batch of sushi, or making sushi fairly often, you can also save on costs by buying the rice, nori, soy sauce, pickled ginger and wasabi paste in bulk.) Here’s what you will need:
Sushi rice: Earlier this week, I shared my full tutorial here on how to make classic sticky sushi rice (using Japanese short-grain white rice, rice vinegar, sugar and salt). It’s easy to make in the Instant Pot, rice cooker or on the stovetop. But be sure to plan ahead with the rice, because it will require some time to cool to room temperature before you begin rolling the sushi.
Nori: The traditional seaweed wrappers used to roll sushi.
Fillings: We tend to stick to really simple fillings in our house — sushi-grade salmon or tuna (or we often use smoked salmon), avocado and cucumber — but see my notes below for other delicious filling ingredient ideas that you are welcome to try. The options here are endless!
Spicy mayo (optional): I always love adding a bit of spicy mayo to my sushi (either drizzled on top or mixed into the fillings), which can be made simply with mayo and Sriracha.
We are admittedly super no-frills in our house when it comes to sushi equipment. For a long time, we rolled our sushi without a mat (just rolled it with our hands), which honestly works fine — your sushi rolls will just not be quite as tight. So if this is your first time making sushi, please don’t feel pressured to purchase lots of extra equipment. A basic cutting board, a sharp knife, and a bowl of water (for dipping your fingers so that the rice does not stick) will work just fine. And then you can always invest in more gear if you find that sushi-making is something you enjoy and want to do again.
That said, though, whenever you are ready to up your game, the first piece of sushi equipment that I recommend purchasing is a basic bamboo sushi mat. (We have this $7 sushi mat set from Amazon.) It will help you to roll the sushi much tighter and is quite easy to use. Also, if you find that you really love making sushi and sashimi and would like to have a knife specifically designed for making long, clean cuts, you may also want to invest in a sushi knife (either stainless steel or non-stick).
How To Make Sushi:
As I mentioned above, the steps for how to make sushi are actually quite simple — they just take some time. ♡ If you happen to have a family member or friend with you, some teamwork can help this process to go much faster. (See my team multitasking tips below!) But otherwise, I recommend just putting on some good tunes, maybe pour yourself an ice-cold drink, and settle in for an hour or so of prep time to make yourself a stellar batch of homemade sushi. Full instructions are included in the recipe below, but here is a quick overview of the steps…
Prep all of your ingredients. First things first, make your sushi rice ideally at least an hour or two in advance so that it has time to cool to room temperature before assembling your rolls. Then go ahead and prep all of your other ingredients so that you can have a nice assembly line ready to go for your rolls.
Press the rice. Then, begin your assembly! The first step will be to press the rice onto your sheet of nori in an even layer, leaving a 1-inch empty border of nori at the top. (See photos above.)
Add the fillings. Next, layer on your fillings horizontally on the rice, side by side, as evenly as possible.
Roll up the sushi. Lift up the bottom edge of the sushi mat and carefully fold it over the fillings until they are enclosed in a roll, yet still leaving the top 1-inch of the empty nori exposed. Use the sushi mat to squeeze the roll in as tightly as possible. (Although not too tight, as you don’t want all of the fillings to squish out!) Dip your fingers in the water bowl once more and use them to wet the remaining 1-inch of nori. Then use the sushi mat to finish rolling up the roll until it is completely enclosed, giving it a final squeeze or two once it has been rolled up to be sure that everything is packed in there tightly. Repeat with the remaining ingredients.
Cut the sushi. Using a very sharp knife, cut the each sushi roll into 8 equal(ish)-sized pieces on a cutting board. Transfer them to your serving plate.
Drizzle and garnish. Drizzle the sushi with the spicy mayo and/or sprinkle with extra toasted sesame seeds.
Serve. Serve immediately, along with pickled ginger, wasabi paste, and soy sauce for dipping. And enjoy!
Possible Variations:
The best part about making homemade maki rolls is that you can customize your sushi exactly the way you like, so do some experimenting and use whatever ingredients and techniques you love best! For example, feel free to…
Use different fillings: As I mentioned above, we most often stick to a salmon (or tuna), avocado and cucumber mix. But of course, you can fill your sushi with just about anything! A few other suggestions:
Proteins: fish, shrimp, crab, scallops, tofu
Veggies: carrots, bell pepper, asparagus, sweet potato, cabbage, green beans, greens, sprouts
Fruit: mango, pineapple, kiwi
Dairy: cream cheese, spicy mayo (see recipe below)
Herbs and seasonings: fresh cilantro, chives, mint, basil, togarishi powder, hot chili peppers
Sauces: sweet chili sauce, eel sauce, ponzu sauce
Make inside-out rolls: If you would like to make inside-out rolls (with the rice on the outside), cover your sushi mat with plastic wrap. Cut the sheet of nori in half. Press the rice onto the nori so that it is completely covered. Then flip the nori upside down, place the fillings inside, and roll up until sealed.
Mix the spicy mayo into the rolls: Instead of drizzling the spicy mayo on top of the rolls, you can also mix it in with the fillings before rolling up the rolls.
Make sushi without a mat: As I mentioned above, we have made sushi without a mat many times by just rolling with our hands. But if you do not have a mat, you can also use a dry kitchen towel or a sheet of parchment paper in its place.
Make gluten-free sushi: Just be sure to use gluten-free tamari (in place of soy sauce) and double-check that all of your other ingredients are certified gluten-free.
Make vegan sushi: Just be sure to use all vegan fillings.
A Few More Tips:
A few more of my best sushi-making tips before we wrap up:
Team multitasking tips: If you happen to have a friend or family member there to help you, a bit of teamwork can make this process go much faster! Barclay and I tag-team this recipe in our little kitchen every Sunday and can make a batch of these maki rolls in about 30 minutes when working together (with the rice prepped ahead of time). These are our roles:
Me: I thinly slice all of the filling ingredients and fill, roll, and slice the maki rolls.
Barc: He does the time-consuming task of pressing the rice onto the nori (he typically has a few sheets ready to go by the time I have finished slicing the filling ingredients and am ready to roll). Then he plates the sliced sushi once it is ready to go, tops it with spicy mayo and toasted sesame seeds, and sets out bowls of soy sauce, pickled ginger and wasabi for serving.
Buying sushi-grade fish: Of course, if you plan to use raw salmon, tuna, or other fish in your sushi, please be sure to double-check that you are purchasing sushi-grade fish. (Which means that it is safe to eat raw.) You can check labels, but I find that it’s easiest to ask a professional at your grocery store or fish market which options are sushi-grade. Many nowadays are frozen, so if you purchase frozen fish, be sure to also thaw it safely in the refrigerator.
Costs: I will note that the cost of ingredients is usually the highest when making your first round, especially if you are also purchasing sushi mats, pickled ginger, soy sauce, and/or wasabi for the first time. The larger the batch (or the more batches) you make, the lower the cost per roll will be. As mentioned above, we buy our sushi rice, nori, pickled ginger, soy sauce and wasabi in bulk because we make this so often, which significantly helps to cut down on costs. But even still, we have found that making an initial batch of 5 rolls homemade is usually significantly cheaper than ordering out at a restaurant.
Practice makes perfect delicious sushi. Bottom line — the more you practice making homemade sushi, the more your sushi skills will improve! It definitely took us a few tries to figure out exactly how thick we prefer the rice to be, how many fillings we like per roll, how tightly to roll, etc. But here’s the good news for us all — even your wonkiest first “practice rolls” will still be delicious. So just have fun with it, try out different ingredients and techniques, and don’t worry about everything looking perfect.
Learn how to make sushi rolls (maki rolls) with this easy homemade sushi recipe! Feel free to use whatever fillings you love best, and see notes above for extra tips and possible variations.
Prep all of your ingredients. It’s important to have all of your ingredients prepped and ready to go before you begin to assemble your rolls. (I especially recommend cooking the rice 1-2 hours ahead of time, so that it can cool to room temperature before assembling the rolls.)
Press the rice. Lay a sheet of nori on a sushi mat* smooth-side-down, with the longer side of the nori facing you. Place a bowl of water nearby. Dip your fingers into the water (this will help the rice not to stick) and sprinkle approximately 1 cup of sushi rice evenly over the nori, leaving a 1-inch border open at the top. Using your fingers, gently but firmly press the rice onto the nori in an even layer, dipping your fingers back into the water as often as needed so that they do not stick. You want the rice to cover the nori as evenly as possible, all the way to the bottom, left and right edges of the sheet. (See photos above.)
Add the fillings. Place the fillings in long horizontal lines on top of the rice, layering the different fillings side by side instead of in one big pile. Sprinkle the toppings a pinch of sesame seeds, if desired.
Roll up the sushi. Lift up the bottom edge of the sushi mat and carefully fold it over the fillings until they are enclosed in a roll, yet still leaving the top 1-inch of the empty nori exposed. Use the sushi mat to squeeze the roll in as tightly as possible. (Although not too tight, as you don’t want all of the fillings to squish out!) Dip your fingers in the water bowl once more and use them to wet the remaining 1-inch of nori. Then use the sushi mat to finish rolling up the roll until it is completely enclosed. Give it a few extra squeezes all around so that it is nice and firmly-packed. Then transfer the entire roll to a cutting board. Repeat with the remaining ingredients to form about 5 sushi rolls.
Cut the sushi. Using a very sharp knife, cut the each sushi roll into 8 equal(ish)-sized pieces. Transfer them to your serving plate.
Drizzle and garnish. Drizzle the sushi with the spicy mayo and/or sprinkle with extra toasted sesame seeds.
Serve. Serve immediately, along with pickled ginger, wasabi paste, and soy sauce for dipping. And enjoy!
Notes
Spicy mayo: Whisk together 1/4 cup Japanese mayo (or any kind of mayo or plain Greek yogurt) and 4 teaspoons sriracha sauce until combined. Taste and add extra sriracha if you would like a spicier sauce. (You can also add in a tiny drizzle of toasted sesame oil and/or honey, if desired.) I like to drizzle the mayo on top of the rolls just before serving, but you can also mix it in with the fillings instead.
Sushi mat: See tips in the post above for how to make sushi without a mat.
What an interesting post! I would have never thought that making sushi at home was actually possible (friends and family alike have tried and failed), that is until I read your tips! Beautiful photos, too.
emily S. —
i completely agree with you that YES I could live off of sushi. my new years resolution was to master the art of sushi making and for starters I am soo thankful for finding your article. thanks sooo much!
Love this! I still plan on making sushi rolls in the near future and wanted to pop over to see if you ever did a post on your sushi party. You did and it rocks!
Happy Friday, Ali!
Gaye —
Hi Ali
Another great dipping sauce is 1/3 cup soy sauce, 3/4 tsp sugar, a few slices of green onion,
a couple of drops of sesame oil, 2 tsp rice wine vinegar and 1 tbsp water. mix dip and enjoy.
I’m a first time visitor but great site.
Gaye
Thank you SO much for sharing this! I have made this twice for my family now (my first two attempts making sushi ever), and we all loved it! The directions are very easy to follow and the sushi itself takes very little time to make. Most importantly, the sushi tasted as good as from our favorite Japanese restaurant!
Thanks for sharing!! Was actually considering taking a class i saw advertised, but your recipe is so detailed I don’t think i need to, i can handle this. i am definitely going to try as I too love love sushi.
Hey, I’m Ali!
My favorite thing in life is time spent around the table. And all the better with some seriously tasty food to bring us all together. more about me »


Nice macro photography! :)
we LOVE making sushi at home, but usually stick to imitation crab & smoked salmon for the “fish”. Great tutorial!
What an interesting post! I would have never thought that making sushi at home was actually possible (friends and family alike have tried and failed), that is until I read your tips! Beautiful photos, too.
i completely agree with you that YES I could live off of sushi. my new years resolution was to master the art of sushi making and for starters I am soo thankful for finding your article. thanks sooo much!
This was so great! We made sushi last night…with your help, thank you!!
Love this! I still plan on making sushi rolls in the near future and wanted to pop over to see if you ever did a post on your sushi party. You did and it rocks!
Happy Friday, Ali!
Hi Ali
Another great dipping sauce is 1/3 cup soy sauce, 3/4 tsp sugar, a few slices of green onion,
a couple of drops of sesame oil, 2 tsp rice wine vinegar and 1 tbsp water. mix dip and enjoy.
I’m a first time visitor but great site.
Gaye
Thank you SO much for sharing this! I have made this twice for my family now (my first two attempts making sushi ever), and we all loved it! The directions are very easy to follow and the sushi itself takes very little time to make. Most importantly, the sushi tasted as good as from our favorite Japanese restaurant!
i want sushi now haha
Thanks for sharing!! Was actually considering taking a class i saw advertised, but your recipe is so detailed I don’t think i need to, i can handle this. i am definitely going to try as I too love love sushi.